Tuesday, December 11, 2018

More Pyrograpny Pendants: Icanthis, Tipple, and Ahh

I have been doing more burning lately on wood shapes.  I have done crosses and I also used round wood discs that are about 1.5".  I have a few more to do but I wanted to do an organic tangle.  I may have been a little ambitious.  I chose to do Icanthis.  It is definitely harder to burn than to draw with a pen. I am still very new to this medium.  Looking forward to trying more things. I remembered to do a short series of pictures to show how it progressed.


This last picture is the difference in the wood after I put the beeswax polish on it.


Tangles used: Icanthis,Tipple, Ah
The shading was done with a triangular shading tip.  Icanthis & Ahh was done with a tip called a spear. Don't remember the size, but it is small, The Tipple is done with  a 1.5 mm ball stylus.


Thanks for visiting.  As always, comments are welcomed, encouraged, and appreciated. 

Sunday, December 2, 2018

More pyrography: Tangled crosses

I picked these up a couple of months ago but as often happens, life got in the way of doing anything with them.  I have done some before and enjoy doing them.  Some smaller ones I actually used a micron to draw patterns on them.  Did not want to do this this time.

 Some times the simplest patterns make for satisfying results.  These are wooden crosses that I got at a craft store. They are about 1.75" x 2.75"x ¼ ".  Not sure what the wood is. It does not say on the package.  Will explain a little more after the picture.


Cannot always do tangles in the way that would with a pen.  The tangle is like perf and used mostly as an embellishment. Some would say it is Tipple, but that tends to be larger. Ends up being a stippling effect.  I used a small stylus ball to do.  My burner is a Razertip.  I use a beeswax polish to finish.  It does darken the wood a little but I do not mind the effect of this.  I like the opposite effect. 

When finished will attach bales to the back and use a black waxed cotton cord  attached to that.  

Thanks for visiting.  As always, comments are welcomed, encouraged, and appreciated.

Go Tangle !!  

Monday, November 19, 2018

Adventures in Pyrography: Tangled Turtle Cutting board

Have been working on this for some time and was finally able to finish it.  It sat idle for a long time as was working on completing a few other projects.  The tangles that I used also took a while to do. Bought the cutting board from Michael's a while back.  Some of you may have seen the cow that did earlier.  Used a Razertip  D-10 burner with medium fixed regular skew for the line work. The tipple and border outline was done with a 2.3 mm stylus ball and the shading in Gneiss was done with a triangular shader.

Here is the finished project. Sorry I did not take lot of pictures of the proceess.  Took this one early on so you can see what I started with.


Here is the way it ended.


Tangles used: Gneiss, Paradox, Tipple

Thanks for visiting.  As always, comments are welcomed, encouraged, and appreciated.

Go Tamgle !!

Sunday, September 30, 2018

Dual Challenge: Diva Challenge #369 - Orb-tastic & Anything Goes - Tangled Art for Everyone - Ode to Crescent Moon

Not sure that I will get this done ion tome to post in the Diva Challenge.   I wanted to do this mostly because I needed to do something that was more repetitive and for me relaxing. I did accomplish this but it took longer than what I expected. I use Tipple a lot but not so much Crescent Moon.  What I did on this was to think of different ways that I could use Crescent Moon.  Are probably more, but I got at least four done.  I used Tipple in the one version in a way that I usually do with Crescent Moon.  I tried to not be so exact with the orbs and even did some "under work" rather than each one having to be a complete orb.  As is fairly common, the shading of this was one of the bigger challenges.  Here is what I come up with.  I hope you enjoy it.


Used 01 Micron and 2H and 4B pencil for shading.

I have not had time to look at what others have done with this challenge.  If you have not either, click on this link and see some interesting uses of orbs.


Thanks for visiting.  As always, comments are welcomed, enccouraged, and appreciated.

Go Tangle !!

Friday, September 7, 2018

New project - No Fuss Fish by Eden Reborn

A family member gave me a link for this project. It is not like I had anything else to do. They were not as easy to make as what it might have seemed.  Probably one of the biggest challenges was using the invisible thread to suspend the finished items.  The design is by Tracy Braybrook of Eden Reborn.  You can see things in her etsy shop at https://www.eetsy.com/uk/shop/edenreborn.com. or her or @EdenReBorn Blog on Facebook.

Here is the finished project.


Not my usual post on Zentangle® projects.

Thanks for visiting.  As usual comments are welcomed, encouraged, and appreciated.

Go Tangle !!

Saturday, July 28, 2018

Alcohol ink wash for a background.

This was a class that I did some time ago that I finally finished the piece.  The class was on different backgrounds so was not as much about the tangles. The process is to wet the paper, and then put the ink on the page.  Then the fun begins.  You then just let the ink run over the page, turning it to spread it on the page in a random fashion.  I don't have a picture of what it looked like before I started tangling but here is what I think is the finished piece.


Most of the tangles are from Zentangle®.  The ones that are not are Birds on a Wire, Wist, Phicops,Fassett, Featherfall and Joy.  I am pretty sure that all of these are on Tangle Patterns.  

Am trying to decide about getting it framed.  That is always a challenge for me.  This is an 8.5 x 11 piece of paper.  

Thanks for visiting.  As always comments are welcomed, encouraged, and appreciated.  

Go Tangle !!!

Friday, July 27, 2018

Beyond the Basics class: Tangled 3-D House

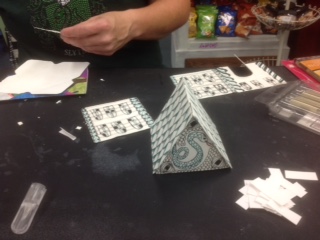
Just completed a class using Dorian Eng's tangled houses concept.  Was a fun enjoyable class.  Was a challenge getting them together but learned a few things that I will use if I do the class again.  Here are pictures of the different pieces to the house.


Only a picture of the gable that is in the front of the house.  The back is similar except  there are no flowers and I did the tangle Gneiss where the window is on this one.


Here are the tiles for the roof.  I used the tangle Shing.  


Here are the front and back.  The front is on the left.


These are the two sides.  


Here are pictures of the house put together.  


The one on the right is one of the student's houses.  This is the front.  I took a series of all sides.  Here they are.


One student had the tangling done but did not get it all constructed. She is a big Harry Potter fan.  She did a Slithering theme.  Here is the picture I took of what she had done in the class.


She sent me a picture of the finished house after class. She has Harry Potter lego figures in front and used an electric candle for the lighting.


Here are pictures that she sent me after she had completed it.


You can see the lego figures better in this picture.


She added tissue paper behind the window cut-outs for an additional "green glow".  Said she was looking for a darker green and may put that in it.


If you are interested in classes, click on my class tab on the banner on the top of my home page. There is information about scheduled classes there.  If have other questions, you can email me.


Thanks for visiting.  As always, comments are welcomed, encouraged, and appreciated.

Go Tangle !!

Saturday, July 21, 2018

Completed cutting board: Burned tangled cow

After 20+ hours I finally finished the cutting board.  Most of the time was spent doing the shading/burning.  Did not realize would take that long.  Probably could have made the striping a little bigger.  That would have cut down on the number that I needed to shade.  Here are the pictures as it progressed.


I am not going to repost all the pictures from the original post but this is what it looked like in the begining. 


Here is the next step of tangling the hooves and creating the legs. Used the tangle Paradox for the hooves.  Only one more step but it was a large one. 


And here is the finished cutting board.  Thought about adding a bell to the collar but opted not to add this.  I am still a "newbie" when it comes to pyrography.   I still have a lot to learn. I could have spend a little more time preparing the wood. I thought I had it pretty smooth, but as was burning, there were a few rough spots.  Think it lead to some feathering, or over burns.  This was also probably due to not having the heat setting quite right. Have the same problem with water colors.  Get impatient.  Try to do things too quickly.  


Tangles used in this are: Tail-Shattuck: Horns-Fassett; Collar-Hybrid variation; Hooves-Paradox; Spot-Striping.  The end of the tail is just line work.  


Thanks for visiting.  As always, comments are welcomed, encouraged, and greatly appreciated.

Go Tangle !!  


Sunday, July 15, 2018

Another pyrography project: Cutting board - Cow shaped

Now that I finished the wood cuff, have moved on to the next project.  I bought a couple of wood forms at Michael's a while ago. One is shaped like a turtle and the other is shaped like a cow.  Not sure why I chose to do the cow first.  Maybe is was because I did not know what I wanted to do on the turtle.  Of course I did not have a clear idea of what I wanted to do with the cow either.  This will be combination of tangles and just some shading.  Have a lot to do yet but here is what I have so far.


Wanted to take a picture of the blank form.  Almost forgot as I started on the tail a little  before I took the picture. 


I started with the tail.  The bottom is just line work and the tail uses the tangle Shattuck


Next I moved up to the ears and horn.  I used Fassett for he horns and some shading for the ears.


This was the hardest section so far.  Most is just shading and making it as dark as I could.  Had to go over it a lot.  The nose was not too hard to do.  The real problem was with the eyes.  I usually do not try to pencil in something but I had to with the eyes.  Tried a couple of things before I finally settled on this style.  I looked at a lot of pictures and tried a couple of different things.  This is the only thing that looked half way decent.  Made me realize why I do not like doing realistic art.  The collar is probably a little too high on the bottom but since I burned it, it has to stay.  Maybe will add something to it.


Will probably work on the feet next.  Have an idea of what I want to do on this. Then will work on the body.  Will probably be a lot of negative space.  Not sure how often I will post the progress on this.  May just do a series  to the end.  

Thanks for visiting.  As always, comments are welcomed, encouraged, and appreciated.

Go Tangle !! 


Friday, July 13, 2018

Tangled Wood Cuff: shaded and polished

Finally finished the shading on the wood cuff that I was working on.  It is difficult to get a picture of the whole thing.  I used the burner for the shading.  It is a triangular shaped nib that is for shading.  I used the edge of it for the darker outline.  The first picture is the wood cuff after all the shading was done.


Here is the cuff after I put the beeswax wood polish on it.


It took some time to do the shading.  Would probably try some different things if I did it again.  But I am pleased with the way that it turned out.


Thanks for visiting.   As always, comments are welcomed, encouraged, and appreciated.

Go Tangle !!

Tuesday, July 10, 2018

Update on the tangled cuff

Brief post just to show the progress so far. Decided to do the shading with the burner.  This is what I have so far, which is about ¼ of the cuff.  Takes a little time as will put down a little shading, then outline it, and then finish the shading.  The wood does get warm. Only slipped off the wood one time when I was working on the edge and caught my finger.  The first picture is from the original post and the second is with the shading that I have done so far.  Will post again when is completed.


Thanks for visiting.  As always, comments are welcomed, encouraged, and appreciated.

Go Tangle !! 

Sunday, July 8, 2018

Finally able to get in a little time on pyrography and a new adventure with henna tattoos

This will be a brief post. It has been some time since I have posted anything. Will try to be more diligent. The only new thing is that I have been doing some henna tattoos.  The other is that I finally had a chance to do some burning.  This is the only thing that I have gotten to so far. Have more things to work on.

Here are a couple pictures of some of the henna tattoos that I did.


Here is the pyrography project that am working on. Have the basic pattern. Not sure what else that I am going to with it.


  This is just a couple of pictures of the same piece.  

Thanks for visiting.  As always, comments are welcomed, encouraged, and appreciated.

Go Tangle !!  

Saturday, June 2, 2018

Mistaken Diva challenge: Bales sampler

I looked at the Diva Challenge and for some reason rather than remembering that it was a monotangle of Puf, I thought it was a monotangle of Bales.  Of course I did not go back and check until I had completed my tile. Oh well.  I like Bales as I see it as a base tangle.  You do the basic grid and then you an experiment with a lot of things.  There are a couple of tangles like this. Cadent is another one that comes to mind.  It is too late to complete another tile for the Challenge so am just posting this on my blog and will also post it in a couple of FB groups.  Here is what I came up with.  Hope you enjoy it.


The outer round is Puf , then is the way that I usually do Bales and then the last two are just variations. Shading done with HB pencil


Thanks for visiting.  As always, comments are welcomed, encouraged, and appreciated.

Go Tangle !! 

Sunday, May 13, 2018

Beyond the Basics class: Layered water color background


Do not post much about things that I do in a class but this was an interesting class.  I had introduced using a water color wash before but did not spend much time on adding layers.  Wanted to have them take their time putting down the water color before they tangled on the piece.  Am waiting to see the finished pieces as they were all so different.  One used a lot of small sections of color and used a lot of organic tangles, which is what she enjoys. With her permission may post a picture of it later.  I am showing the piece that I did.  I used larger sections of color and layered the same color on top. Did not try to layer different colors for muted or different effects.  Will post a series of pictures showing the piece as it progressed.  Really did not have a plan when I started. Picked a tangle and just let it develop.  Here is the results.


Thought I had a picture of just the water color but I guess that I did not .  I first did  what I am calling "Semi-crazy" Huggins.  Is not a regular grid but not too much "wonkiness".  I then put in Finery and then Puf.  


Next I added Inapod and then put Paradox around the outside.


I then added Zander in both sections. The next was the Flora variation and then added the Phicops and Zingers to finish it off.


I then added Mooka, Flux, and Tipple.  The Tipple was added and randomly.  Was looking at different orientations when I took this picture.


And here is the finished piece with the last section finished.   The paper is water color paper and is 6"x 8". 


The last tangle is Opsess, one that I did the step out for.

I have a couple of other projects I want to get to but want to do something like this again.  I would like to use smaller areas of color and try more blending like when doing the gems.  That is a time consuming process so not sure when I will get to it.

Thanks for visiting.  As always, comments are welcomed, encouraged, and appreciated.

Go Tangle !! 


Sunday, April 22, 2018

Diva Challenge #360: "Duotangle Shattuck vs Tripoli"

This week' challenge is a duotangle which featured two tangles that I enjoy doing.  Shattuck was one of the first tangles that I learned and Tripoli was released shortly before I became a CZT.  Although I use to use Tripoli a lot, I realized when I started doing it, I have not used it much lately. The things I have been doing lately have been more organic. I used a Renaissance tile as it was what I had with me at the time.  Here is what I came up with. I hope you enjoy it.


Tangles used: Shattuck, Tripoli, 
Highlights done with white Gelly Roll.

I never to much shading or highlighting on Tripoli,  I just let the different patterns develop.  I have not had a chance to look at what others have submitted. If you have not either, would highly recommend that you to to I am the Diva and look at the other pieces submitted.

Thanks for visiting.  As always, comments are welcomed, encouraged, and appreciated.

Go Tangle !!  

Wednesday, April 11, 2018

Diva Challenge #359: "String Theory - Finger Stringer"

This week's Diva Challenge presented different challenges to me than last weeks.  Last week's was what I consider "regular" tangling challenges of focus.  This week had to do more with my mood and reaction to recent events.  I will try to explain this without boring you too much.

 There are typical life events, like dealing with aging parents that have been dealing with for about a year.  There are probably events everyday that someone will have a reaction to.  This past week I guess they have been closer to me or people I know.  They are not unique, except to these individuals.  I know people who were affected by the terrible crash in Saskatchewan province that killed 15 members of the Humbolt Broncos hockey team. Then there was the devastating fire to the home, and death of fellow CZT Cris Letourneau's husband in the fire.

 I found my self with very strong reactions to this.  I wanted to do something as words didn't seem enough.  Was not sure what to do. When I saw what this week's challenge was, I began trying to think of a way I could use this art form that Cris is so much a part of it to honor her, her daughter Alexa,  and these other people.  I had a couple of ideas but was not sure that I would be able to do any of them.  I finally decided on something to try.  Not sure that I pulled it off, but this is what I came up with.  I hope you enjoy it.


Tangles used:  Joy, Indy-rella, The border I do not think is an actual tangle.
Shading done with HB pencil

I was not sure that this really fit the challenge exactly.  I was able to draw around one hand, folded. I was unsure whether to tangle on the string itself and opted not to. I think it would have gotten lost in the rest or the tile.  On a regular tile I would not worry about this as much and actually prefer that the string get lost.  As I stated above, I am not sure that the double heart border is actually a tangle.  There are really two ways to do this.  One is you can make connecting hearts and then flip the tile and add the upper arcs of a heart in the space between them. The other is to make altenating "S" shapes.  By alternating I mean you do one and then do mirror images.  That does take some focus, at least for me.

Congratulations if you have managed to get all the way through this post and not just skipped to the picture. If you have not all ready done so would encourage you to go to I am the Diva and look at the art that others have submitted.  Just click on the link.  I got mine done earlier this week so am hoping I can spend time looking at  a few more than I have been able to lately.

Thanks for visiting.  As always, comments are welcomed, encouraged and appreciated.

Go Tangle !!

Saturday, April 7, 2018

Diva Challenge #358: UMT - "Pickpocket by Tomas Pedros"

Was not sure that I was going to get anything to post.  This week's challenge was a "Use my Tangle" and featured the tangle Pickpocket.  This tile had a couple of those "unplanned opportunities".  I almost decided just to give up, but opted not to.  Try to encourage my students to use what is there and make it their own.  So that is what I did.  The first "opportunity came up right away. I had seen the tangle before and did not look at the video and the stepout was a little hard to see.  What I did not take into account is that the orientation of the triangles was important to the tangle. If I do the tangle again I would change a few things. One I would start out making triangles rather than dots and trying to turn the dots into triangles.  I also did not notice that the tangle comes together by starting on the top of one dot and going to the bottom the next one.  I could also choose not to try to turn them into triangles and keep the circles which would make it less angular.  Either way, I think the key is going from top to bottom.  I did the small section and was not sure what to do.  After letting it set for a while decided to add a few of the tangles that I enjoy doing.  Is this my favorite tile? Probably not, but it is still unique and there are things that I like about it.  The second "opportunity" occurred when I started doing Featherfall.  I was rushing and just saw the 01 on the Micron.  As I was doing it, it not very good light, I thought that the ink looked different.  It almost looked like it might if the pigment separated and it was more of a blue.  Well after I decided to turn on a little more light and look at the pen, I found out I had grabbed a purple Micron rather than the black.  What to do?  At first I was just going to start using the black where I realized I had been using the purple.  I decided to go ahead and finish the Featherfall with the purple and then use black for the other tangle with which I combined it. That part was planned. Oh well, have to remind myself that I have to use the same principles that I try to instill in my students.  Here is what I came up with, I hope you enjoy it.


Tangles used: Pickpocket, Flux, Zinger, Featherfall, Plume_ar, and Paradox
Shading done with HB pencil. As you can probably tell, I did not use a string in this tile,  It is separated into quadrants however.  

I have not had a chance to look at other things that people have done.  I have seen a few that have been posted elsewhere or have shown up in my "read" file.  Hope to look at some but have lots of other things to do.  If you have not come here from I am the Diva, would suggest that you to there and look at all the great art that has been submitted.  Just click on the link above. If you usually do not participate, give it a try, whether you post it or not.

Thanks for visiting.  As always, comments are welcomed, encouraged, and appreciated..
Go Tangle !!